Add References
Add the Reference to your Project to connect with Bode 100
To be able to connect to your Bode 100 device you first have to add the Bode Automation Interface reference to your project.
The Bode Automation Interface uses the "OmicronLab.VectorNetworkAnalysis.AutomationInterface.dll" which can be found in the installation directory.
Important
Using COM is not recommended for new developments. We recommend using the SCPI interface.
Not all programming languages in combination with the COM interface support Enums. We have to set them as numbers, see here.
Note
You need to have the correct USB driver installed on your system. The simplest way to install the USB driver is to run our “Bode Analyzer Suite” installer available for download at OmicronLab
Instruction for adding references to various programming languages:
- Add Reference in MatLab
- Add Reference in Octave
- Add Reference in Python
- Add Reference in Excel
- Add Reference in Java
- Add Reference in Delphi using Lazarus
- Add Reference in Visual C++
- Add Reference in LabWindows CVI
- Add Reference in C#
Add Reference in MatLab
To add the Bode 100 reference in your MatLab project you simply have to use the following code:
automationInterface = actxserver('OmicronLab.VectorNetworkAnalysis.AutomationInterface');
bode = automationInterface.Connect();

s21 = bode.Transmission.CreateS21Measurement();

s21.ConfigureSweep(10,40000000, 201, 'SweepMode_Linear');
s21.ReceiverBandwidth = 'ReceiverBandwidth_kHz1';
state = s21.ExecuteMeasurement();

resultFrequency = s21.Results.MeasurementFrequencies;
resultMagnitude = s21.Results.Magnitude('MagnitudeUnit_dB');
resultPhase = s21.Results.Phase('AngleUnit_Degree');

figure
subplot(2,1,1)
plot(resultFrequency,resultMagnitude);
title('Gain')
xlabel('Frequency')
ylabel('Magnitude in dB')

subplot(2,1,2)
plot(resultFrequency, resultPhase);
xlabel('Frequency')
ylabel('Phase in degree')

% shut down
bode.ShutDown();

release(automationInterface);
Add Reference in Octave
Note
We focused some issues when using Octave's 'Clear' command (https://octave.sourceforge.io/octave/function/clear.html) in combination with COM. Using COM is not recommended for new developments. We recommend using the SCPI interface. Therefore use the 'Clear' command with deliberation because it may lead to unexpected crashes.
To add the Bode 100 reference in your Octave project you simply have to use the following code:
%NOTE! Package required for COM support
pkg load windows;

automationInterface = actxserver('OmicronLab.VectorNetworkAnalysis.AutomationInterface');
bode = automationInterface.Connect();

%Constants
points = 201;

%NOTE! In Octave it is NOT possible to set Enums as their Name. We have to set them as numbers.
sweepMode_Linear = 0;
%NOTE! Custom Receiver Bandwidth values are in Milli Hz. -> Since we define a constat here this value has to be in Milli Hz [mHz]
receiverBandwidth_kHz1 = 1000000;
magnitudeUnit_dB = 0;
angleUnit_Degree = 1;

s21 = bode.Transmission.CreateS21Measurement();

s21.ConfigureSweep(10,40000000, points, sweepMode_Linear);
s21.ReceiverBandwidth = receiverBandwidth_kHz1;
state = s21.ExecuteMeasurement();

resultFrequency = zeros(1,points);
resultMagnitude = zeros(1,points);
resultPhase = zeros(1,points);
for j = 1:points
  resultFrequency(j) = s21.Results.MeasurementFrequencyAt(j - 1);
  resultMagnitude(j) = s21.Results.MagnitudeAt(j - 1, magnitudeUnit_dB);
  resultPhase(j) = s21.Results.PhaseAt(j - 1, angleUnit_Degree);
end

figure
subplot(2,1,1)
plot(resultFrequency,resultMagnitude);
title('Gain')
xlabel('Frequency')
ylabel('Magnitude in dB')

subplot(2,1,2)
plot(resultFrequency, resultPhase);
xlabel('Frequency')
ylabel('Phase in degree')

% shut down
bode.ShutDown();

release(automationInterface);
Important
Using Octave to access the Bode Automation Interface will only wirk with GNU Octave version 7.1.0 or higher. There existed a bug that would prevent the COM component from being initialized. The error occured due to changes made in how the COM wrappers work in .NET 6. This bug was fixed with the release of version 7.1.0.
Add Reference in Python
To add the Bode 100 reference in your Python project you have to perform the following steps:
import pythoncom
import win32com.client
import pywintypes

#Constants
#In Python it is not possible to set Enums as their Name. We have to set them as numbers.
#For Linear Sweep use '0'
SweepMode_Linear = 0
#For Logarithmic Sweep use '1'
SweepMode_Log = 1

#NOTE! Custom Receiver Bandwidth values are in Milli Hz. -> Since we define a constat here this value has to be in Milli Hz [mHz]
ReceiverBandwidth_kHz1 = 1000000;

def Init():
    automationInterfaceUnk = pythoncom.CoCreateInstance(pywintypes.IID('OmicronLab.VectorNetworkAnalysis.AutomationInterface'), None, pythoncom.CLSCTX_ALL, pythoncom.IID_IUnknown)
    automationInterface = win32com.client.Dispatch(automationInterfaceUnk.QueryInterface(pythoncom.IID_IDispatch))
    bode = automationInterface.Connect()

    s21 = bode.Transmission.CreateS21Measurement()
    s21.ConfigureSweep(10, 40000000, 201, SweepMode_Linear)
    s21.ReceiverBandwidth = ReceiverBandwidth_kHz1
    state = s21.ExecuteMeasurement()

    if state == 0:
        print ("Execution State is OK!")
    else:
        print ("An error happened!")

    print ("\nResults:\n")

    fequs = s21.Results.MeasurementFrequencies
    vals = s21.Results.ComplexValues()

    for x in range(0, s21.Results.Count):
        com = vals[x]
        val = com.MagnitudeDB
        phase = com.Phase
        print ("Frequency: " + str(fequs[x]) + "      Value: " + str(val) + "  Phase: " + str(phase))

    bode.ShutDown()

if __name__ == "__main__":
    Init()
Important
Accessing the Bode Automation Interface from Python has slightly changed. Using 'Dispatch' directly on the 'ProgId' no longer works. The reason for this is that, the way COM wrappers work in .NET 6 has changed. Instead 'CoCreateInstance' has to be used first and then 'Dispatch' can be used as seen in the code above. Using COM is not recommended for new developments. We recommend using the SCPI interface.
Add Reference in Excel
Note
To add the Bode 100 reference in your Excel project be sure that you Enabled Macros in Excel
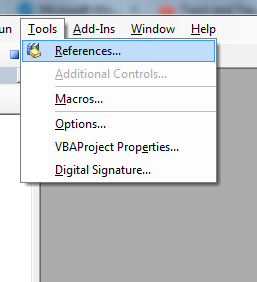
Open the Visual Basic (for applications) Editor and navigate through the following pages:
Open reference dialogue
Select the Bode Automation Interface Reference
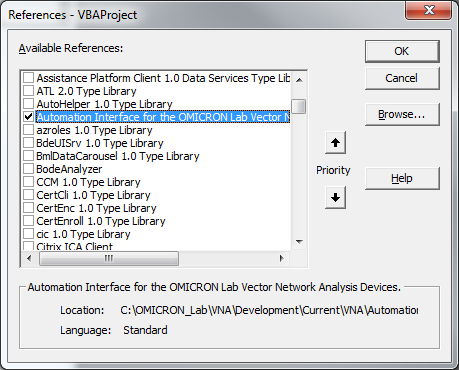
Click OK.
After successfully adding the reference execute following code to gain access to the device.
Sub Init()
    Dim ai As BodeAutomation
    Set ai = New BodeAutomation

    Dim bode As Bode100
    Set bode = ai.Connect()

    Dim meas As S21Measurement
    Set meas = bode.Transmission.CreateS21Measurement()

    meas.ConfigureSweep 10, 40000000, 201, SweepMode_Logarithmic
    meas.ReceiverBandwidth = ReceiverBandwidth_kHz1
    State = meas.ExecuteMeasurement

    MsgBox "Status: " & State & " Count: " & meas.Results.Count

    bode.ShutDown
End Sub
Add Reference in Java
Jacob is a Java COM bridge that can be downloaded and used to access the COM Automation components from Java.
To use Jacob in Eclipse perform the following steps after downloading it as an archive and then extracting it:
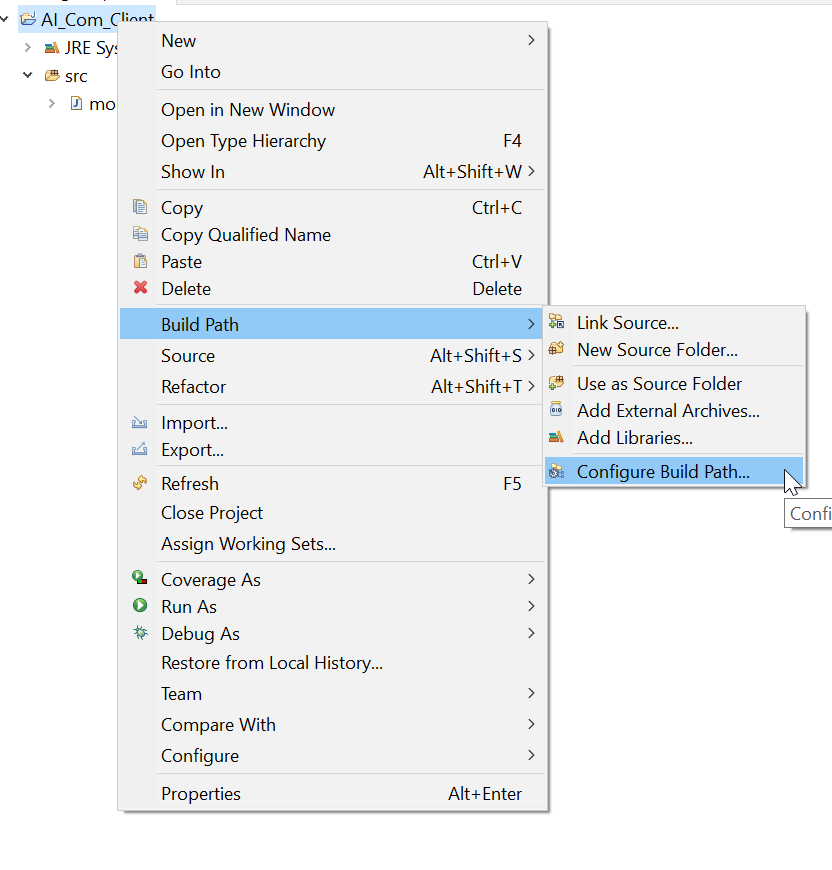
In Eclipse right click on the Java Project and hover over the 'Build Path' option and then select 'Configure Build Path...'
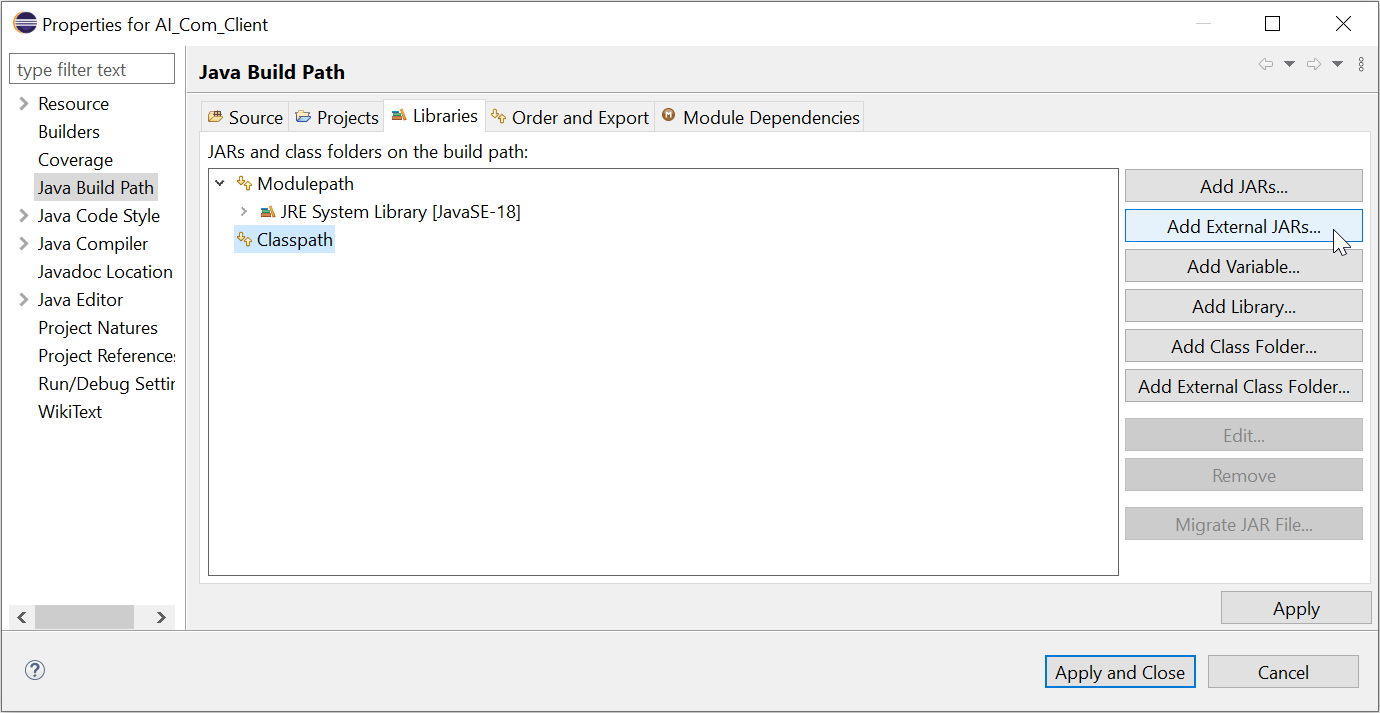
In the 'Libraries' tab select the 'Classpath' option and then click on the button 'Add External JARs...'. There the 'jacob.jar' can be searched on your file system and added to the classpath.
Afterwards expand the 'jacob.jar' by clicking the arrow to left of the jar. Then select 'Native library location'.
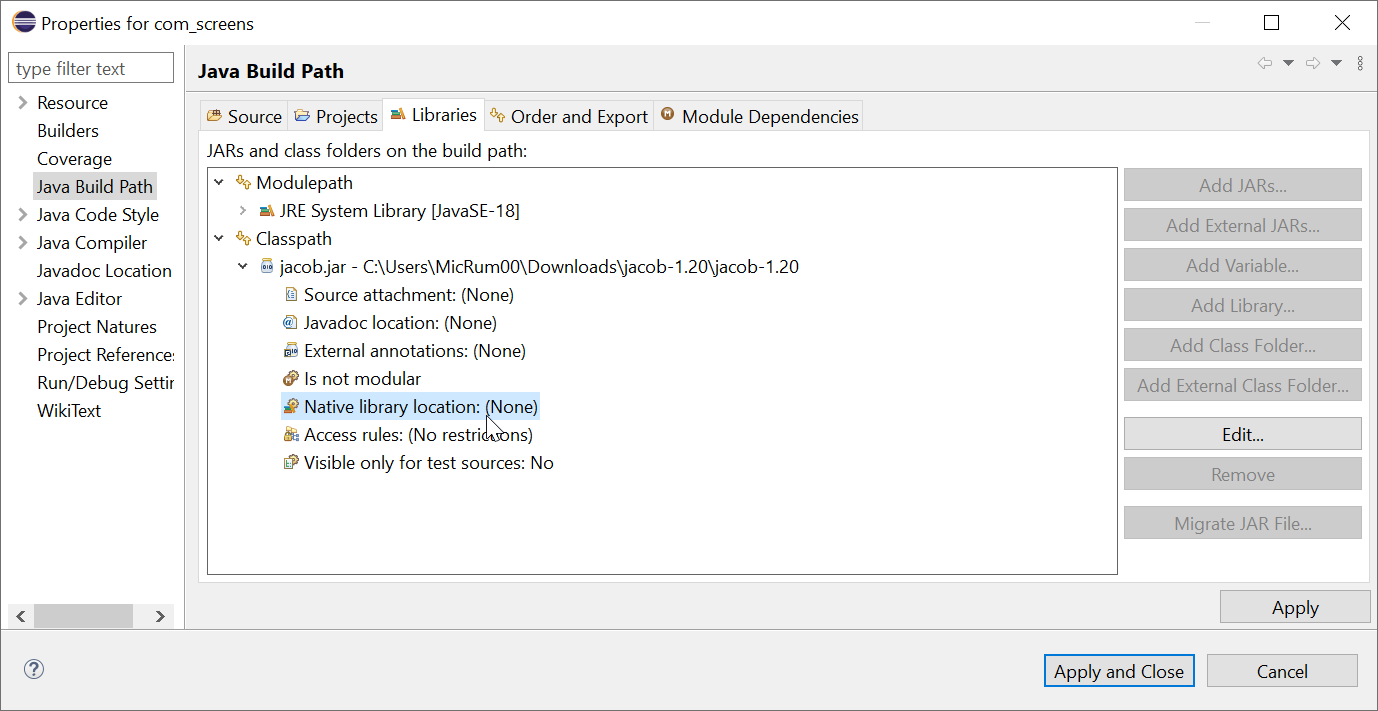
Set the 'Native Library Location' to the directory that contains the jacob.dll files for 64 and 32 bit (which are downloaded alongside the 'jacob.jar').
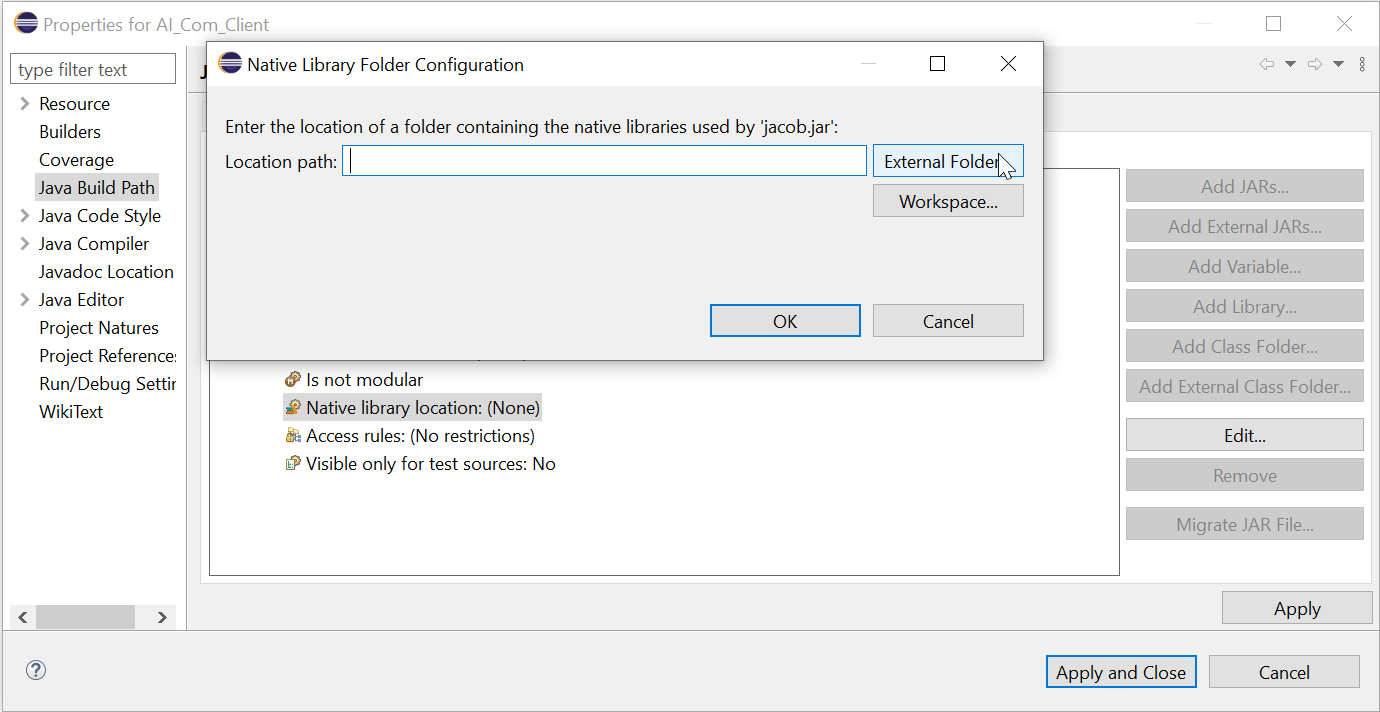
After performing these steps the COM Automation components can be accessed by using 'invoke' as well as 'getProperty' to access the methods and properties of the COM Automation components:
import com.jacob.activeX.ActiveXComponent;
import com.jacob.com.*;

public class automationInterfaceComClient {

    public static void main(String[] args) {

        ActiveXComponent bode = null;

        try {
            ActiveXComponent automationInterface = new ActiveXComponent("OmicronLab.VectorNetworkAnalysis.AutomationInterface");
            bode = automationInterface.invokeGetComponent("Connect");
            ActiveXComponent transmission = bode.getPropertyAsComponent("Transmission");
            ActiveXComponent s21Measurement = transmission.invokeGetComponent("CreateS21Measurement");

            Variant[] sweepArgs = new Variant[] {
                    new Variant(1000),
                    new Variant(100000),
                    new Variant(201),
                    new Variant(0)
            };

            s21Measurement.invoke("ConfigureSweep", sweepArgs);
            s21Measurement.invoke("ExecuteMeasurement");
            ActiveXComponent results = s21Measurement.getPropertyAsComponent("Results");

            SafeArray magnitudes = results.invoke("Magnitude", 0).toSafeArray();
            SafeArray frequencies = results.getProperty("MeasurementFrequencies").toSafeArray();

            for (int i = 0; i <= frequencies.getUBound(); i++) {
                System.out.println(String.format("Value: %s, Frequency %s", magnitudes.getDouble(i), frequencies.getDouble(i)));
            }
        }
        catch(Exception ex) {
            ex.printStackTrace();
        }
        finally {
            bode.invoke("ShutDown");
        }
    }
}
Note
In earlier versions we suggested to use Com4J. This Java COM Bridge does no longer work though. Contrary to Com4J Jacob uses late binding instead of early binding. Due to this, the 'invoke' and 'getProperty' methods have to be used to access the COM Automation component's methods and properties. Using COM is not recommended for new developments. We recommend using the SCPI interface.
Add Reference in Delphi using Lazarus
In order to use COM type libraries it is necessary to install LazActiveX package (comes already with Lazarus).
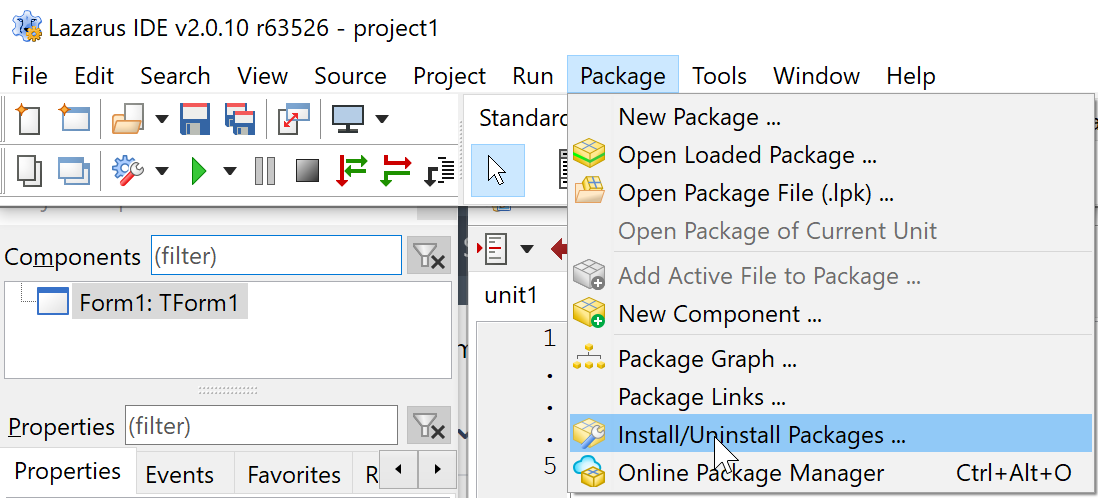
Select LazActivex from the right hand side list, click on "Install package" and the package should appear in the list on the left.
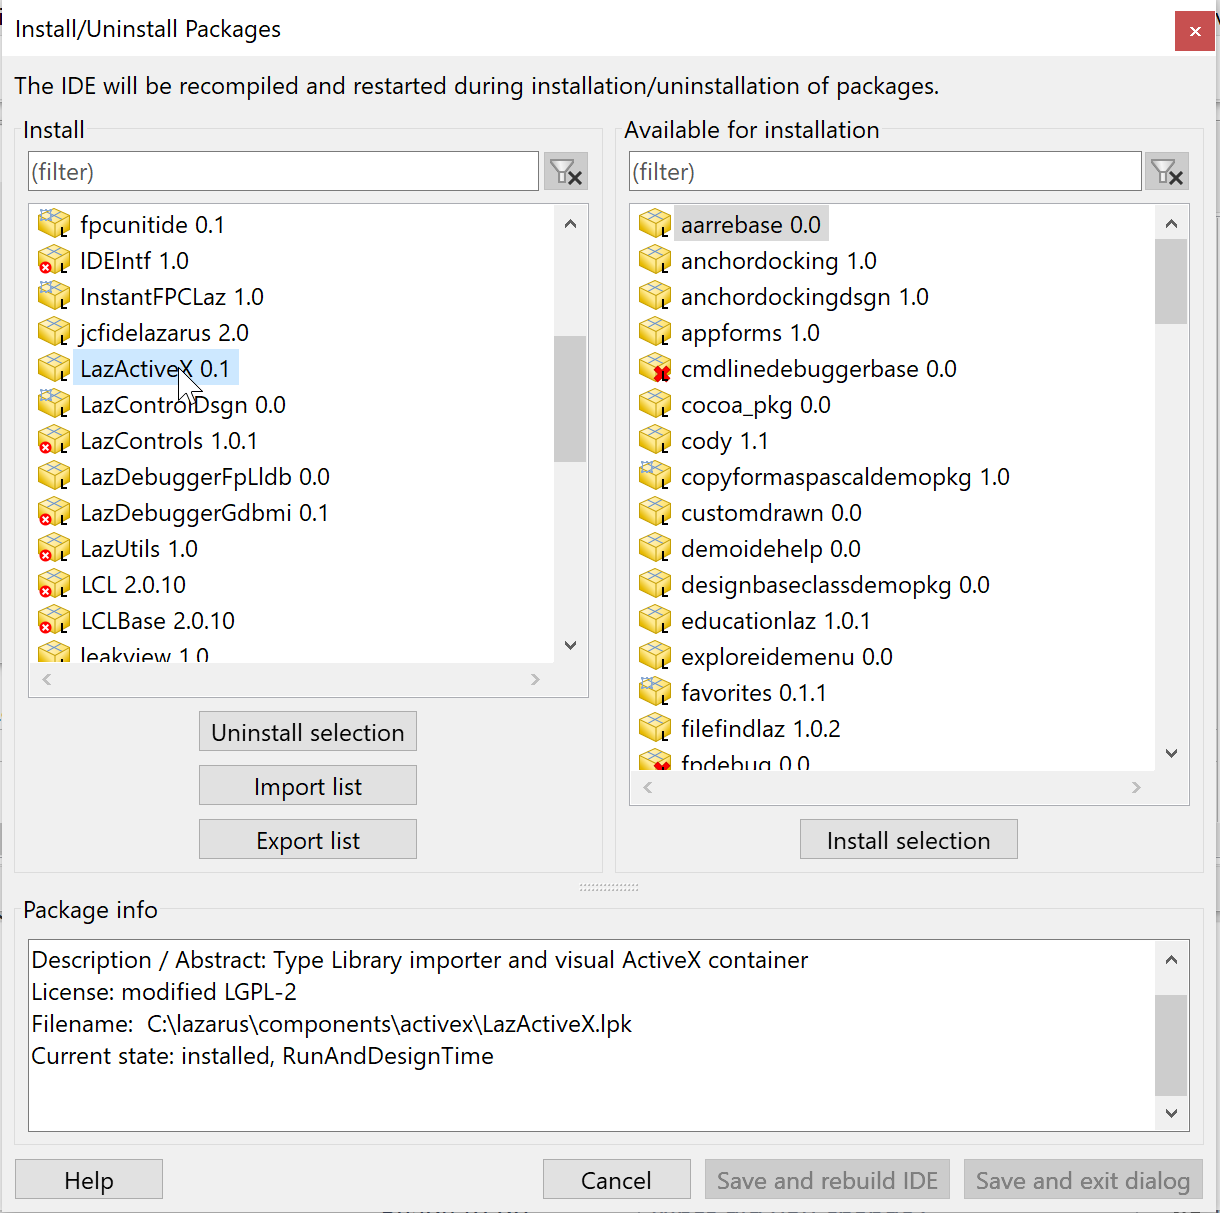
Click on "Save and Compile IDE".
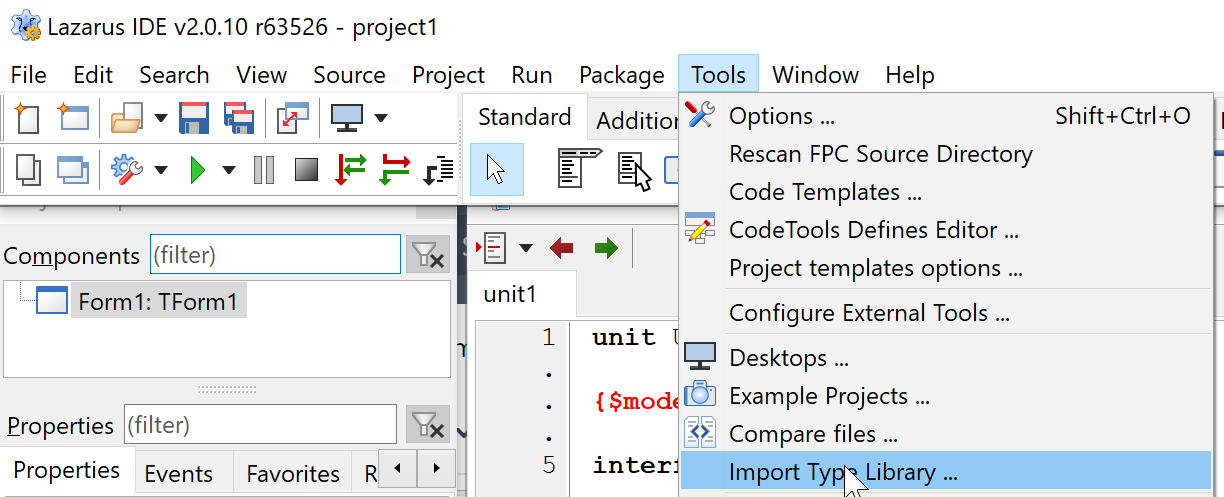
Register for COM library: Open Tools → "Import Type Library ..." ...
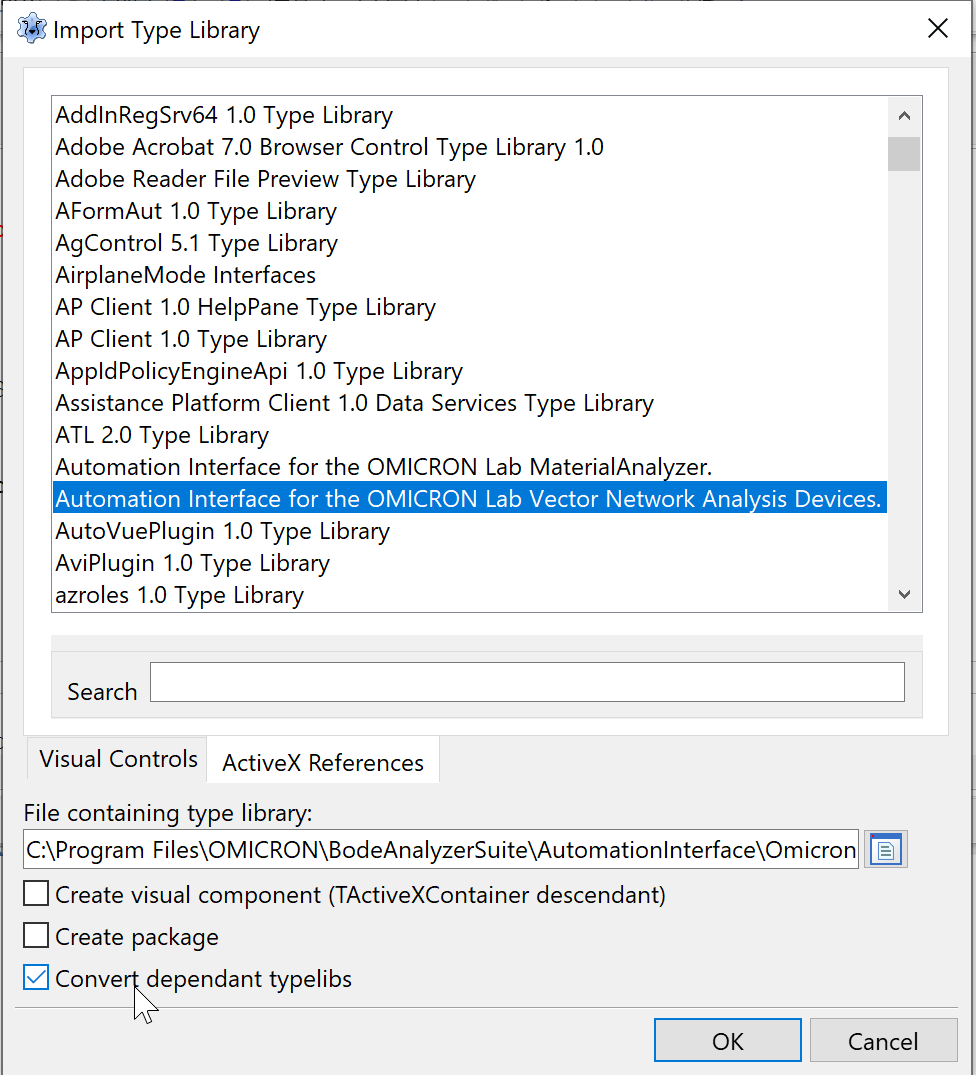
... and select the listed "Automation Interface for the ..."
Note
Using COM is not recommended for new developments. We recommend using the SCPI interface.
Example of program:
```
program DelphyCOMTest;

{$mode objfpc}{$H+}

uses
  {$IFDEF UNIX}{$IFDEF UseCThreads}
  cthreads,
  {$ENDIF}{$ENDIF}
  Classes, mscorlib_2_4_TLB, ActiveX, Windows,
     OmicronLab_VectorNetworkAnalysis_AutomationInterface_3_25_TLB;
var
  ai: BodeAutomationInterface;
  bode: BodeDevice;
  s21 : S21Measurement;
  execState: ExecutionState;
  lb : Longint;
  ub : Longint;
  index : Longint;
  pindex : PLongint;
  mag : double;
  freq : double;
  executed : bool;

begin
 try
    executed := false;
    Writeln('Hello everybody ...');
    ai := CoBodeAutomation.Create;
    bode := ai.Connect();
    s21 := bode.Transmission.CreateS21Measurement();
    s21.ConfigureSweep(10,1000,201,SweepMode_Linear);

    WriteLn('Device type: ' + bode.DeviceType);
    writeln('Serial nr.: ', bode.serialNumber);
    writeln('Source mode: ', bode.SourceMode);
    writeln('Min frequency: ', bode.DeviceProperties.MinFrequency);
    writeln('Max frequency: ', bode.DeviceProperties.MaxFrequency);
    writeln('Min output level: ', bode.DeviceProperties.MinOutputLevel);
    writeln('Max output level: ', bode.DeviceProperties.MaxOutputLevel);

    WriteLn('Executing measurement ...');
    execState := s21.ExecuteMeasurement();
    WriteLn('Execution returned with: ', execState);

    SafeArrayGetLBound(s21.Results.Magnitude(MagnitudeUnit_dB), 1, lb);
    SafeArrayGetUBound(s21.Results.Magnitude(MagnitudeUnit_dB), 1, ub);

     // Write results to console
     for index := lb to ub do
     begin
         pindex := @index; // different to embaccadero!
         SafeArrayGetElement(s21.Results.Magnitude(MagnitudeUnit_dB), pindex, mag);
         SafeArrayGetElement(s21.Results.MeasurementFrequencies, pindex, freq);
         Writeln('Magnitude: ', mag, ' dB', ' @', freq, ' Hz' );
     end;
     executed := true;
 finally
     bode.ShutDown();
     if (executed = false)
        then writeln('There was an exception during the execution!')
        else writeln('Execution completed!');
     WriteLn('Press ENTER key to continue ...');
     ReadLn;
 end;
end.
```
Note
In the line "ai := CoBodeAutomation.Create;", pay attention to the "Co" in the beginning. This is a naming convention from Delphi and it is mandatory, to create an instance of the automation interface.
Note
An alternative to the cost free Lazarus is Embarcadero. It can also be used to access the Bode Automation Interface at the cost of a payed license though.
Add Reference in Visual C++
Note
The AutomationInterface is only comatible to Visual Studio 2012 or higher versions.
How to perform measurements in Visual C++:
- Create a new Visual C++ console application in Visual Studio 2015 (2012 or higher). (Similar in other Versions)
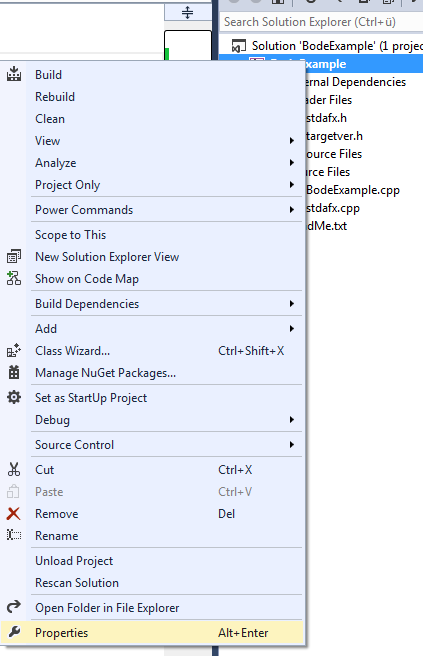
In the Solution Explorer right click on the project and select Properties.
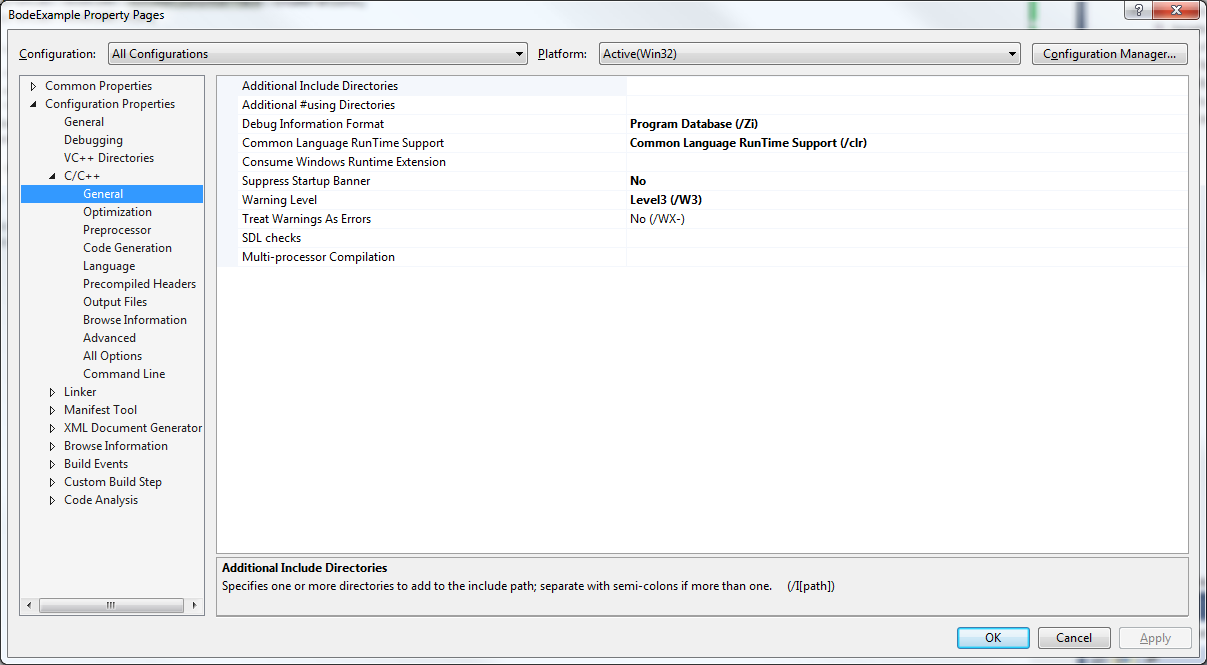
Navigate to "Configuration Properties" -> "C/C++" -> "General". Check if the "Common Language RunTime Support" is set to "/clr". Next you may have to change some other settings, depending on your default settings. Visual Studio will tell you what to do when you try to build the project.
Note
After telling the C++ compiler that we want to use 'clr' building will most likely fail. These are some the errors that might ocurr, but they can be fixed by changing some properties:
- cl : Command line error D8016: '/ZI' and '/clr' command-line options are incompatible
Project->Properties->Configuration Properties->C/C++->General->
Debug Information Format: Program Database (/Zi) - cl : Command line error D8016: '/clr' and '/Gm' command-line options are incompatible
Project->Properties->Configuration Properties->C/C++->Code Generation->
Enable Minimal Rebuild: No - cl : Command line error D8016: '/clr' and '/EHs' command-line options are incompatible
Project->Properties->Configuration Properties->C/C++->Code Generation->
Enable C++ Exceptions: Yes with SEH Exceptions (/EHa) - cl : Command line error D8016: '/clr' and '/RTC1' command-line options are incompatible
Project->Properties->Configuration Properties->C/C++->Code Generation->
Basic Runtime Checks: Default - cl : Command line error C7681: two-phase name lookup is not supported for C++/CLI or C++/CX; use /Zx:twoPhase-
Project->Properties->Configuration Properties->C/C++->Language->
Conformance mode: No (/permissive)
- cl : Command line error D8016: '/ZI' and '/clr' command-line options are incompatible
All settings are correct when trying build the project will result in the error that the assembly 'mscorlib.dll' could not be found.
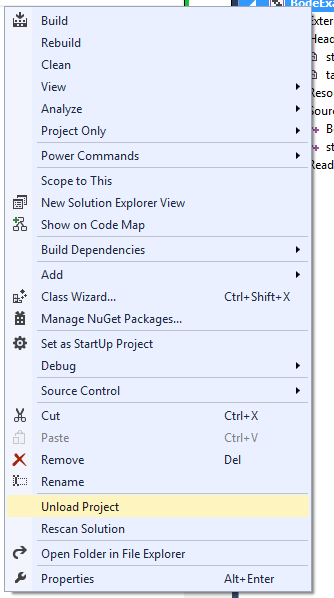
Now we have to change the .net Framework version. Since this is not possible in the settings we have to change it in the project configuration file. Therefore unload the project by right clicking on the project and select "Unload Project".
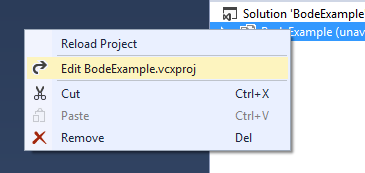
Now right click the unloaded project and select "Edit BodeExample.vcxproj" (BodeExample is the project name)
Locate the tag
<PropertyGroup Label="Globals">there INSERT the tag:<TargetFrameworkVersion>v4.7.2</TargetFrameworkVersion><PropertyGroup Label="Globals"> <VCProjectVersion>16.0</VCProjectVersion> <Keyword>Win32Proj</Keyword> <ProjectGuid>{95b1666d-65ab-4c07-84d1-1c9281985212}</ProjectGuid> <RootNamespace>AIComClient</RootNamespace> <WindowsTargetPlatformVersion>10.0</WindowsTargetPlatformVersion> <TargetFrameworkVersion>v4.7.2</TargetFrameworkVersion> </PropertyGroup>However, the project file may still think this is not a CLR project, so the Framework assemblies don’t show in the Add ref dialog. To fix this issue the line
<CLRSupport>true</CLRSupport>has to be added for each configuration (both Win32 Debug and Release as well as Win64 Debug and Release) as shown below:<PropertyGroup Condition="'$(Configuration)|$(Platform)'=='Debug|Win32'" Label="Configuration"> <ConfigurationType>Application</ConfigurationType> <UseDebugLibraries>true</UseDebugLibraries> <PlatformToolset>v143</PlatformToolset> <CharacterSet>Unicode</CharacterSet> <CLRSupport>true</CLRSupport> <!--Here--> </PropertyGroup> <PropertyGroup Condition="'$(Configuration)|$(Platform)'=='Release|Win32'" Label="Configuration"> <ConfigurationType>Application</ConfigurationType> <UseDebugLibraries>false</UseDebugLibraries> <PlatformToolset>v143</PlatformToolset> <WholeProgramOptimization>true</WholeProgramOptimization> <CharacterSet>Unicode</CharacterSet> <CLRSupport>true</CLRSupport> <!--Here--> </PropertyGroup> <PropertyGroup Condition="'$(Configuration)|$(Platform)'=='Debug|x64'" Label="Configuration"> <ConfigurationType>Application</ConfigurationType> <UseDebugLibraries>true</UseDebugLibraries> <PlatformToolset>v143</PlatformToolset> <CharacterSet>Unicode</CharacterSet> <CLRSupport>true</CLRSupport> <!--Here--> </PropertyGroup> <PropertyGroup Condition="'$(Configuration)|$(Platform)'=='Release|x64'" Label="Configuration"> <ConfigurationType>Application</ConfigurationType> <UseDebugLibraries>false</UseDebugLibraries> <PlatformToolset>v143</PlatformToolset> <WholeProgramOptimization>true</WholeProgramOptimization> <CharacterSet>Unicode</CharacterSet> <CLRSupport>true</CLRSupport> <!--Here--> </PropertyGroup>Now save it (Ctrl + S) then again right click on the project and select "Reload Project".
After perfoming these steps building the C++ project should be successful.
Add the OmiconLab.VectorNetworkAnalysis.AutomationInterface.dll reference to the project.
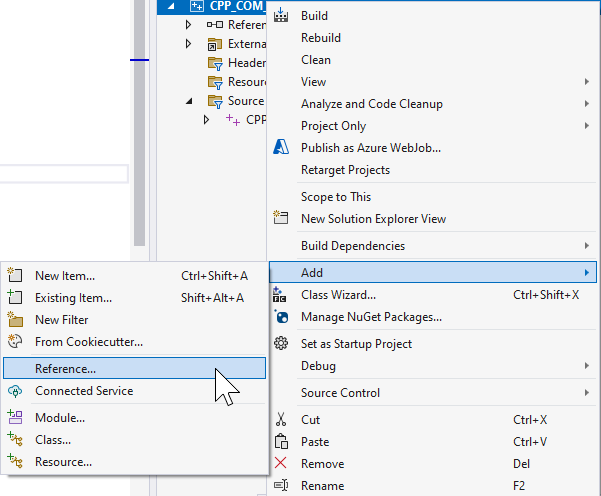
Right click on the project and under 'Add' select 'Reference...'
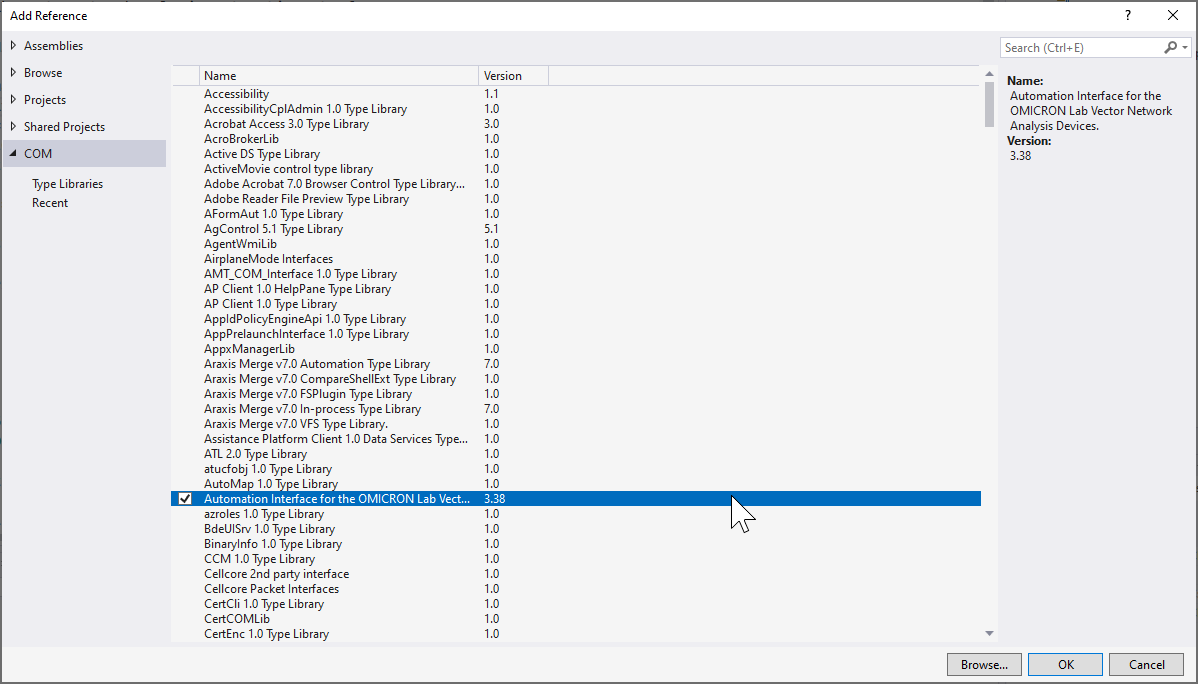
Under 'COM' find the Automation Interface TLB and add it to the project
Note
It is important to notice, that the option to add COM references will only show up when step 7 and step 8 have been completed. Using COM is not recommended for new developments. We recommend using the SCPI interface.
This will create an DLL file that enables COM
After adding the reference to the project a post build event has to be added that copies the Interop-DLL file to the folder that also contains the '.exe' file since the project will not run properly otherwise.
Go to the properties window under 'Post-Build Event':
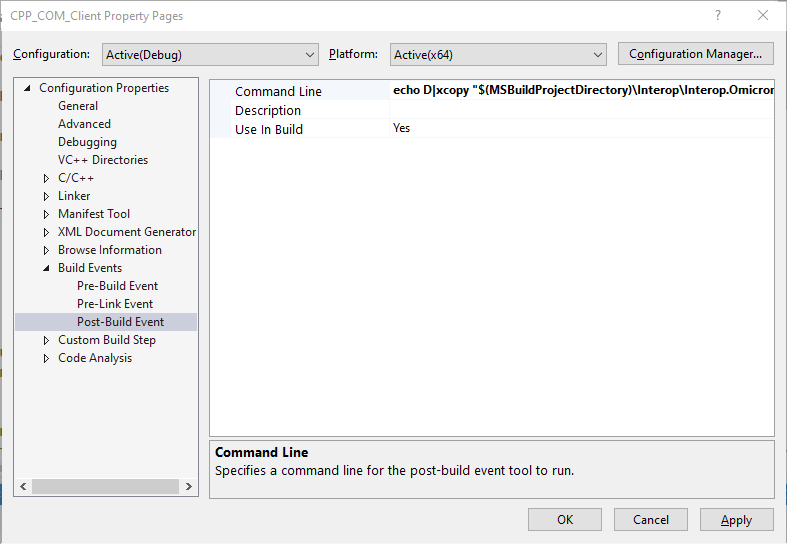
Add the following command in the 'Command Line' field:
echo D|xcopy "$(MSBuildProjectDirectory)\Interop\Interop.OmicronLab_VectorNetworkAnalysis_AutomationInterface.3.25.dll" "$(SolutionDir)x64\Debug"The exact value that the command evaluates to can be found by clicking on the arrow and then selecting 'Edit' to edit the value.
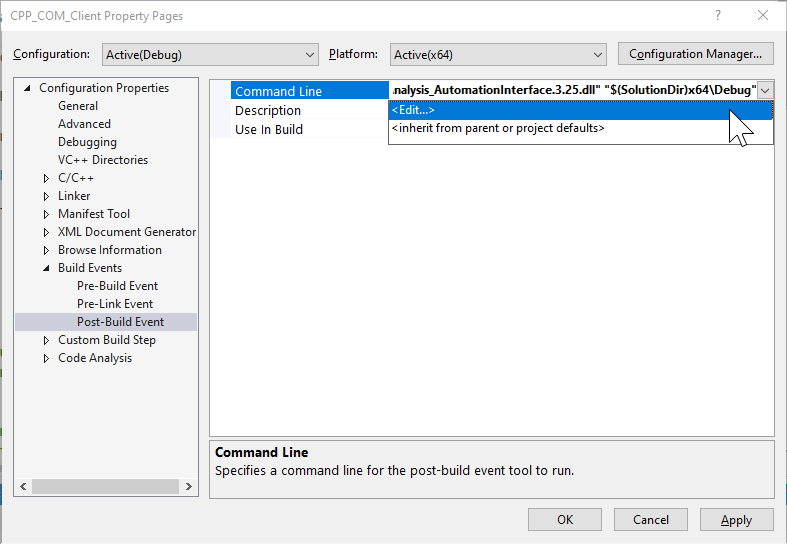
This path may vary based on the C++ project setup. These steps can also be skipped and the 'Interop.OmicronLab_VectorNetworkAnalysis_AutomationInterface.3.25.dll' file can be manually copied to the folder that contains the '.exe' file of the project.
Now you are ready to implement your measurement.
Source:
https://blogs.msdn.microsoft.com/calvin_hsia/2013/08/30/call-managed-code-from-your-c-code/
Performing a measurement:
#include <iostream>
#include <tchar.h>

using namespace OmicronLab_VectorNetworkAnalysis_AutomationInterface;

int _tmain(int argc, _TCHAR* argv[])
{
    BodeAutomation^ automation = gcnew BodeAutomationClass();
    BodeDevice^ bode = automation->Connect();
    S21Measurement^ s21 = bode->Transmission->CreateS21Measurement();
    s21->ConfigureSweep(10, 1000, 201, SweepMode::SweepMode_Linear);
    s21->ReceiverBandwidth = ReceiverBandwidth::ReceiverBandwidth_kHz1;

    ExecutionState state = s21->ExecuteMeasurement();

    for (int i = 0; i < s21->Results->Magnitude(MagnitudeUnit::MagnitudeUnit_dB)->Length; i++)
    {
        std::cout << safe_cast<double>(s21->Results->Magnitude(MagnitudeUnit::MagnitudeUnit_dB)->GetValue(i));
        std::cout << "\n";
    }
    bode->ShutDown();
    return 0;
}
Add Reference in LabWindows CVI
How to perform measurements in LabWindows CVI:
- Create a new Project in LabWindows/CVI 2013
Navigate to "Tools -> Create ActiveX Controller"
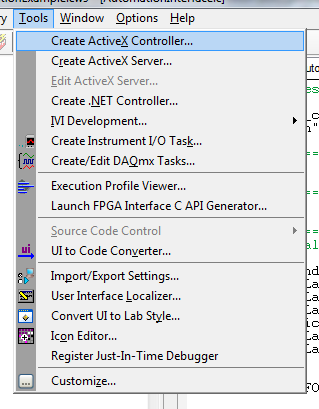
Click "Next". In the following windows select the AutomationInterface reference.
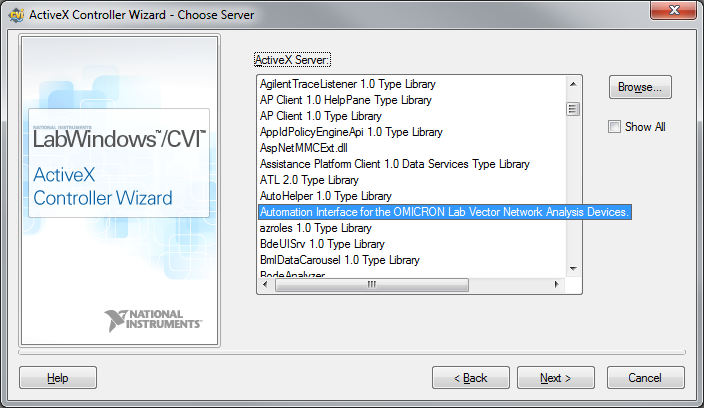
Again click Next. Select an "Instrument Prefix" in this case "OmicronAI" and Select a "Target .fp File" (Click Browse to create new file, in this example "AutomationInterface.fp").
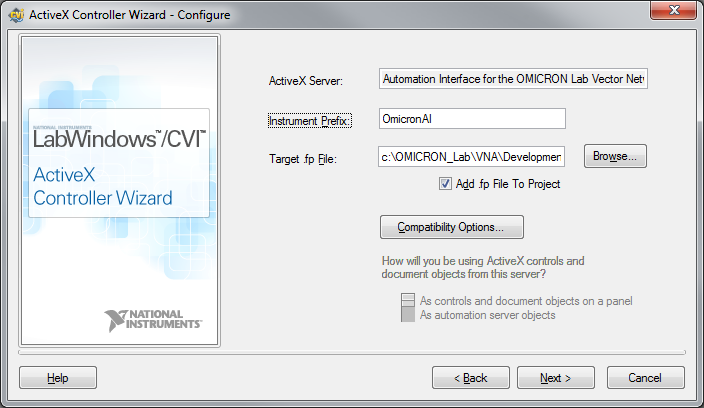
Click "Next" until the window closes. Now LabWindows/CVI generates a "AutomationInterface.fp", "AutomationInterface.c" and "AutomationInterface.h" file.
Right click the project to add a new File.
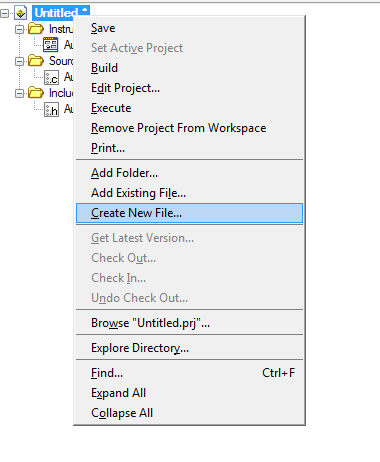
Select "Source File", a "File name" and a "File folder".
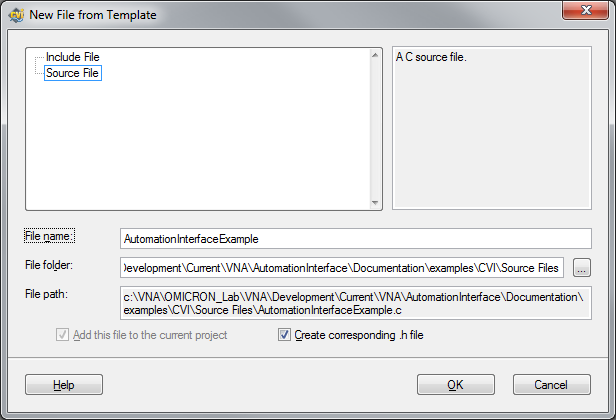
Click ok. Now you are able to implement your measurement in the generated source file.
Implement a measurement with the following code:
// Title:       AutomationInterfaceExample.c

// Include files
#include "AutomationInterface.h"
#include <ansi_c.h>

static CAObjHandle automationInterface = 0;
static OmicronAIObj_BodeDevice bodeHandle = 0;
static OmicronAIObj_Transmission transmissionHandle = 0;
static OmicronAIObj_S21Measurement s21Handle = 0;
static enum OmicronAIEnum_ExecutionState state = 0;
static OmicronAIObj_GainResults gainResultHandle = 0;
static ERRORINFO ErrorInfo;

int main(int argc, char *argv[])
{
    HRESULT error = 0;
    SAFEARRAY* magnitudes;
    double *arrMagnitudes;
    int i = 0;
    int x = 0;
    int count = 201;


    error = OmicronAI_NewBodeAutomationInterface(NULL, 1, LOCALE_NEUTRAL, 0, &automationInterface);

    error = OmicronAI_BodeAutomationInterfaceConnect(automationInterface, &ErrorInfo, &bodeHandle);

    error = OmicronAI_BodeDeviceGetTransmission(bodeHandle, &ErrorInfo, &transmissionHandle);

    error = OmicronAI_TransmissionCreateS21Measurement(transmissionHandle, &ErrorInfo, &s21Handle);

    error = OmicronAI_S21MeasurementConfigureSweep(s21Handle, &ErrorInfo, 100, 10000, count, OmicronAIConst_SweepMode_Linear);

    error = OmicronAI_S21MeasurementSetReceiverBandwidth(s21Handle, &ErrorInfo, OmicronAIConst_ReceiverBandwidth_kHz1);

    error = OmicronAI_S21MeasurementExecuteMeasurement(s21Handle, &ErrorInfo, &state);

    error = OmicronAI_S21MeasurementGetResults(s21Handle, &ErrorInfo, &gainResultHandle);

    error = OmicronAI_GainResultsMagnitude(gainResultHandle, &ErrorInfo, OmicronAIConst_MagnitudeUnit_dB, &magnitudes);

    arrMagnitudes = (double*)magnitudes->pvData;
    for(i; i <  count; i++)
    {
        printf("Magnitude Value: %f\n", arrMagnitudes[i]);
    }

    error = OmicronAI_BodeDeviceShutDown(bodeHandle, &ErrorInfo);

    scanf("Press any key to close: %d",&x);
}
Note
OmicronAI_ is the selected Instrument Prefix.
Note
Principially it is also possible to create a .NET Controller instead of the previously explained ActiveX Controller. Following that approach one needs to consider:
- LabWindows/CVI 2013 is not supported. We tested the basic functionality with LabWindows/CVI 2017.
- The Bode Automation Interface assembly "OmicronLab.VectorNetworkAnalysis.AutomationInterface.dll" needs to be specified by path because it is not registered in the Global Assembly Cache.
- The function panels will not be generated for all items (because of too long CVI identifiers).
- Be sure that all Source-dlls from the Bode Automation Interface installation folder are copied to your CVI project folder.
Add Reference in C#
How to add the Bode Automation Interface Reference in C# is described in the Step-by-Step Examples C# section.