Add Reference in Visual C++
Note
The AutomationInterface is only comatible to Visual Studio 2012 or higher versions.
How to perform measurements in Visual C++:
Create a new Visual C++ console application in Visual Studio 2015 (2012 or higher). (Similar in other Versions)
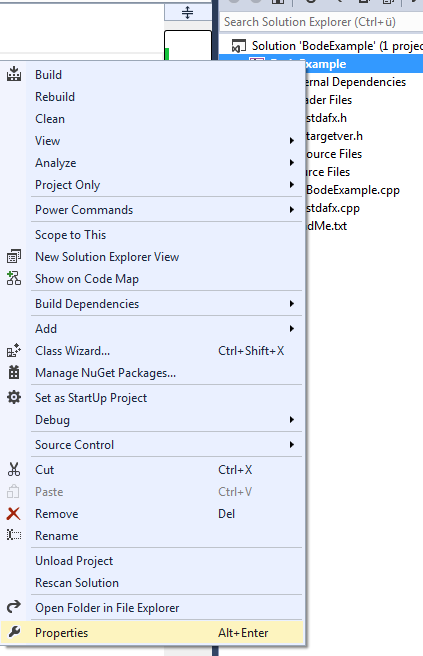
In the Solution Explorer right click on the project and select Properties.
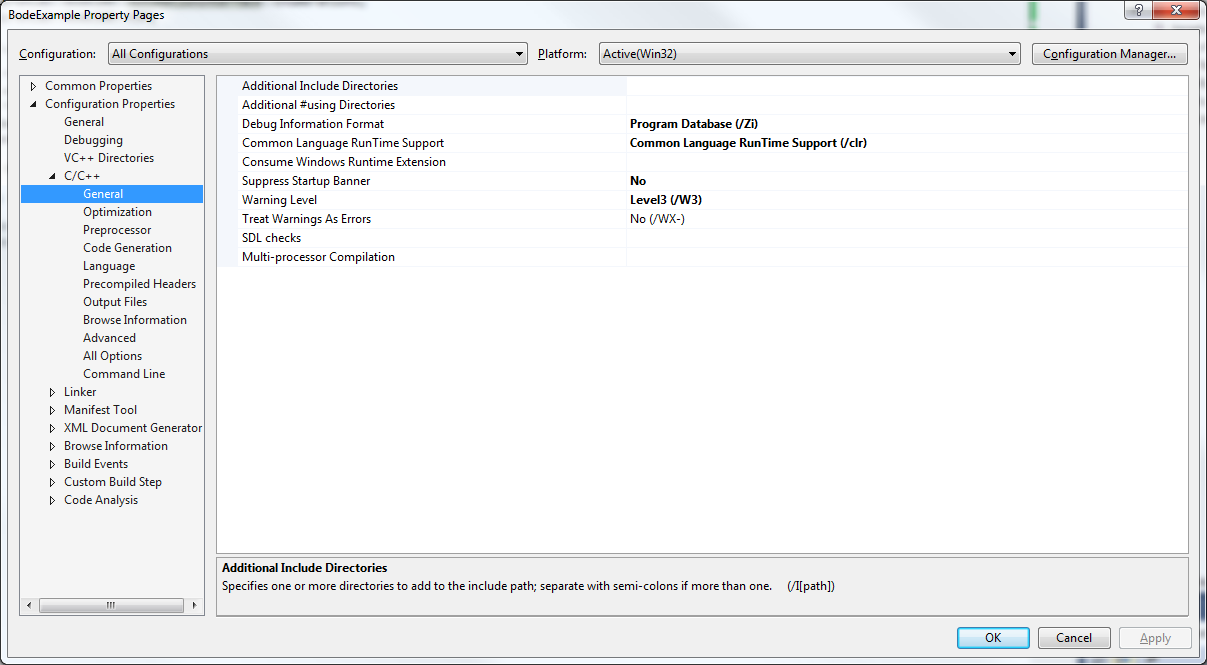
Navigate to "Configuration Properties" -> "C/C++" -> "General". Check if the "Common Language RunTime Support" is set to "/clr". Next you may have to change some other settings, depending on your default settings. Visual Studio will tell you what to do when you try to build the project.
Note
After telling the C++ compiler that we want to use 'clr' building will most likely fail. These are some the errors that might ocurr, but they can be fixed by changing some properties:
- cl : Command line error D8016: '/ZI' and '/clr' command-line options are incompatible
Project->Properties->Configuration Properties->C/C++->General->
Debug Information Format: Program Database (/Zi) - cl : Command line error D8016: '/clr' and '/Gm' command-line options are incompatible
Project->Properties->Configuration Properties->C/C++->Code Generation->
Enable Minimal Rebuild: No - cl : Command line error D8016: '/clr' and '/EHs' command-line options are incompatible
Project->Properties->Configuration Properties->C/C++->Code Generation->
Enable C++ Exceptions: Yes with SEH Exceptions (/EHa) - cl : Command line error D8016: '/clr' and '/RTC1' command-line options are incompatible
Project->Properties->Configuration Properties->C/C++->Code Generation->
Basic Runtime Checks: Default - cl : Command line error C7681: two-phase name lookup is not supported for C++/CLI or C++/CX; use /Zx:twoPhase-
Project->Properties->Configuration Properties->C/C++->Language->
Conformance mode: No (/permissive)
- cl : Command line error D8016: '/ZI' and '/clr' command-line options are incompatible
All settings are correct when trying build the project will result in the error that the assembly 'mscorlib.dll' could not be found.
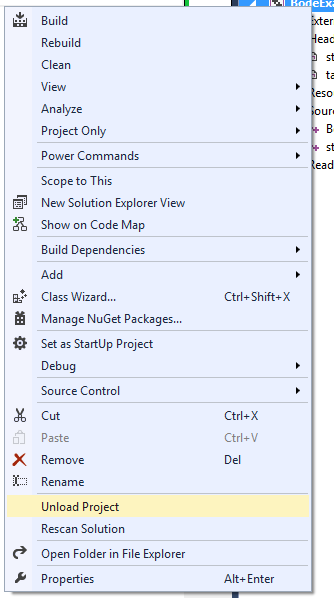
Now we have to change the .net Framework version. Since this is not possible in the settings we have to change it in the project configuration file. Therefore unload the project by right clicking on the project and select "Unload Project".
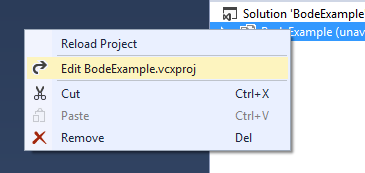
Now right click the unloaded project and select "Edit BodeExample.vcxproj" (BodeExample is the project name)
Locate the tag
<PropertyGroup Label="Globals">there INSERT the tag:<TargetFrameworkVersion>v4.7.2</TargetFrameworkVersion><PropertyGroup Label="Globals"> <VCProjectVersion>16.0</VCProjectVersion> <Keyword>Win32Proj</Keyword> <ProjectGuid>{95b1666d-65ab-4c07-84d1-1c9281985212}</ProjectGuid> <RootNamespace>AIComClient</RootNamespace> <WindowsTargetPlatformVersion>10.0</WindowsTargetPlatformVersion> <TargetFrameworkVersion>v4.7.2</TargetFrameworkVersion> </PropertyGroup>However, the project file may still think this is not a CLR project, so the Framework assemblies don’t show in the Add ref dialog. To fix this issue the line
<CLRSupport>true</CLRSupport>has to be added for each configuration (both Win32 Debug and Release as well as Win64 Debug and Release) as shown below:<PropertyGroup Condition="'$(Configuration)|$(Platform)'=='Debug|Win32'" Label="Configuration"> <ConfigurationType>Application</ConfigurationType> <UseDebugLibraries>true</UseDebugLibraries> <PlatformToolset>v143</PlatformToolset> <CharacterSet>Unicode</CharacterSet> <CLRSupport>true</CLRSupport> <!--Here--> </PropertyGroup> <PropertyGroup Condition="'$(Configuration)|$(Platform)'=='Release|Win32'" Label="Configuration"> <ConfigurationType>Application</ConfigurationType> <UseDebugLibraries>false</UseDebugLibraries> <PlatformToolset>v143</PlatformToolset> <WholeProgramOptimization>true</WholeProgramOptimization> <CharacterSet>Unicode</CharacterSet> <CLRSupport>true</CLRSupport> <!--Here--> </PropertyGroup> <PropertyGroup Condition="'$(Configuration)|$(Platform)'=='Debug|x64'" Label="Configuration"> <ConfigurationType>Application</ConfigurationType> <UseDebugLibraries>true</UseDebugLibraries> <PlatformToolset>v143</PlatformToolset> <CharacterSet>Unicode</CharacterSet> <CLRSupport>true</CLRSupport> <!--Here--> </PropertyGroup> <PropertyGroup Condition="'$(Configuration)|$(Platform)'=='Release|x64'" Label="Configuration"> <ConfigurationType>Application</ConfigurationType> <UseDebugLibraries>false</UseDebugLibraries> <PlatformToolset>v143</PlatformToolset> <WholeProgramOptimization>true</WholeProgramOptimization> <CharacterSet>Unicode</CharacterSet> <CLRSupport>true</CLRSupport> <!--Here--> </PropertyGroup>Now save it (Ctrl + S) then again right click on the project and select "Reload Project".
After perfoming these steps building the C++ project should be successful.
Add the OmiconLab.VectorNetworkAnalysis.AutomationInterface.dll reference to the project.
Right click on the project and under 'Add' select 'Reference...'

Under 'COM' find the Automation Interface TLB and add it to the project
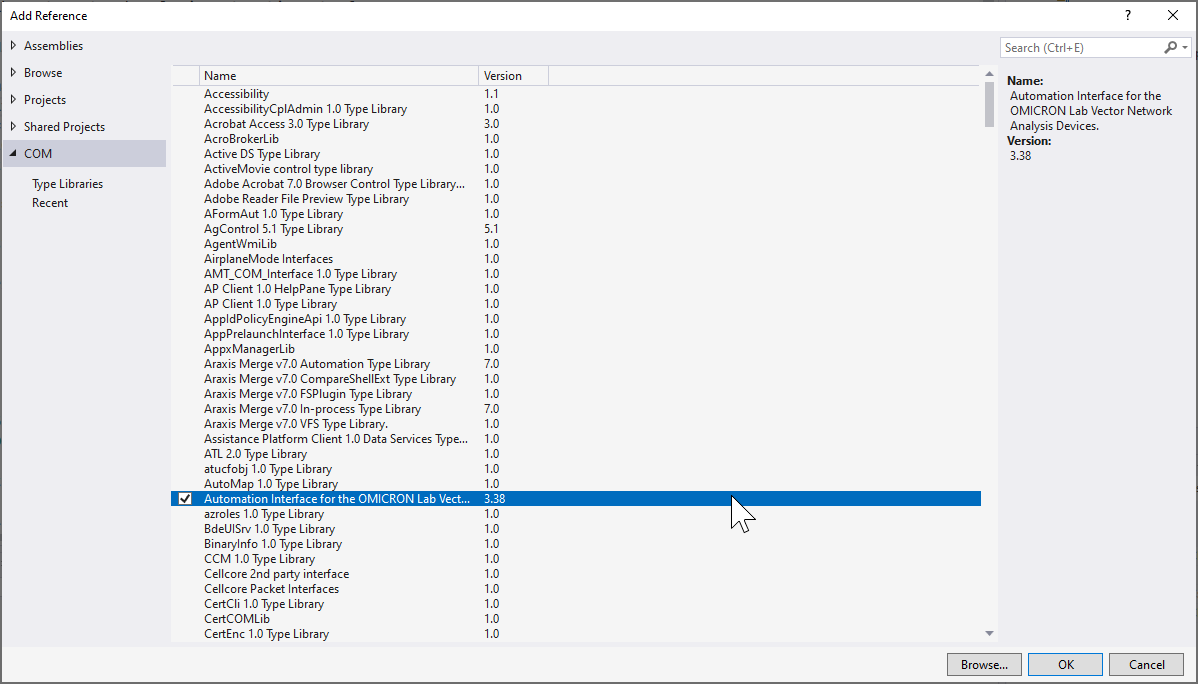
Note
It is important to notice, that the option to add COM references will only show up when step 7 and step 8 have been completed. Using COM is not recommended for new developments. We recommend using the SCPI interface.
- This will create an DLL file that enables COM
After adding the reference to the project a post build event has to be added that copies the Interop-DLL file to the folder that also contains the '.exe' file since the project will not run properly otherwise.
Go to the properties window under 'Post-Build Event':
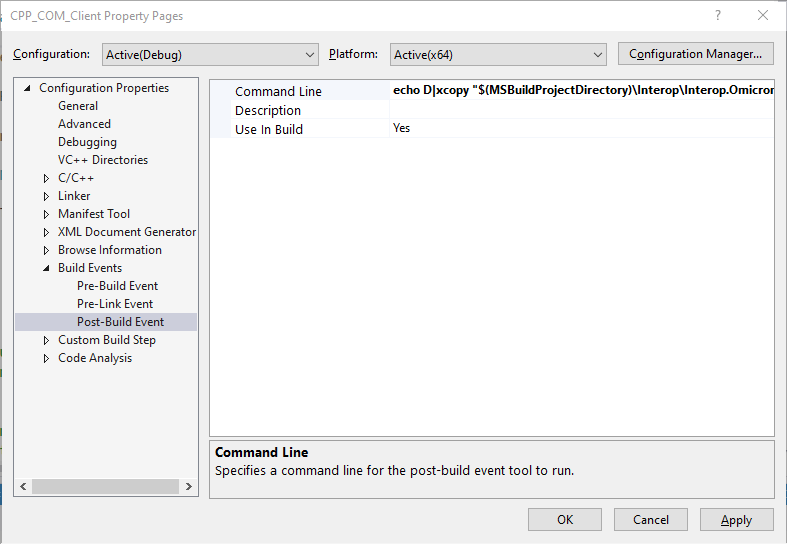
Add the following command in the 'Command Line' field:
echo D|xcopy "\((MSBuildProjectDirectory)\Interop\Interop.OmicronLab_VectorNetworkAnalysis_AutomationInterface.3.25.dll" "\)(SolutionDir)x64\Debug"
The exact value that the command evaluates to can be found by clicking on the arrow and then selecting 'Edit' to edit the value.
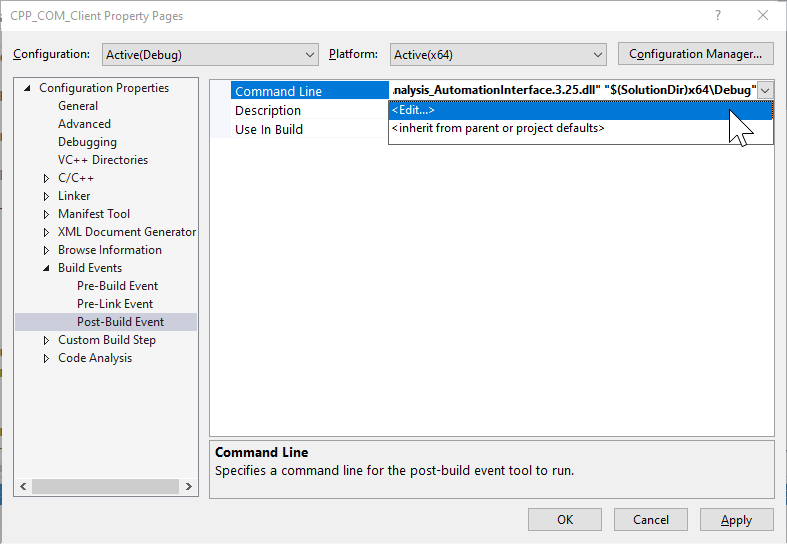
This path may vary based on the C++ project setup. These steps can also be skipped and the 'Interop.OmicronLab_VectorNetworkAnalysis_AutomationInterface.3.25.dll' file can be manually copied to the folder that contains the '.exe' file of the project.
Now you are ready to implement your measurement.
Source:
https://blogs.msdn.microsoft.com/calvin_hsia/2013/08/30/call-managed-code-from-your-c-code/
Performing a measurement:
#include <iostream>
#include <tchar.h>

using namespace OmicronLab_VectorNetworkAnalysis_AutomationInterface;

int _tmain(int argc, _TCHAR* argv[])
{
    BodeAutomation^ automation = gcnew BodeAutomationClass();
    BodeDevice^ bode = automation->Connect();
    S21Measurement^ s21 = bode->Transmission->CreateS21Measurement();
    s21->ConfigureSweep(10, 1000, 201, SweepMode::SweepMode_Linear);
    s21->ReceiverBandwidth = ReceiverBandwidth::ReceiverBandwidth_kHz1;

    ExecutionState state = s21->ExecuteMeasurement();

    for (int i = 0; i < s21->Results->Magnitude(MagnitudeUnit::MagnitudeUnit_dB)->Length; i++)
    {
        std::cout << safe_cast<double>(s21->Results->Magnitude(MagnitudeUnit::MagnitudeUnit_dB)->GetValue(i));
        std::cout << "\n";
    }
    bode->ShutDown();
    return 0;
}